Must Know The Best Dermatologist

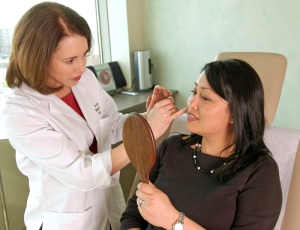
How To Find a Good Dermatologist

Putting your face into the hands of someone else is an act of faith and trust. Here are some tips on how to find a good dermatologist and laser center. I also give you a link to my own list of great dermatologists all over the country.

The difference between a great doctor (and laser center) and a just-okay one is that a great doctor will get consistently good results a higher percentage of the time. And, if you have a problem or complication

Is there a doctor on site?

This is regulated state-by-state and, believe it or not, some states do not require the Medical Director (that is, the Doctor) of a laser center to be on the premises any more than an hour or two a month. The doctor is the doctor in name only at these clinics. There is almost no physician training, supervision, or quality control for “technicians” to ensure that the lasers are set properly for the patients, that the lasers are maintained properly, that the treatments are done correctly, and that problems are handled promptly and well.

Is the doctor Board-certified in dermatology?

It’s shocking, but there is no law preventing doctors from calling themselves whatever they want. Many centers all over the country are being set up by doctors who have absolutely no medical training in skin but who have decided that they want to cash in on skin services.

Have they been in business more than 5 years?

This is also a key question, because many “skin clinics” and mini-spas fail within the first 3 to 5 years. They may start well initially, with heavy advertising to bring in customers. But they often cannot sustain a high level of results and safety over a broad spectrum of their customer base. So they go out of business, leaving in their wake a trail of lawsuits, unhappy and sometimes scarred patients, and patients who have paid money for services that they never received.

TIPS: WHAT TO LOOK FOR IN A DERMATOLOGIST

Dermatologists diagnose and treat more than 3,000 different diseases and conditions related to the skin, hair, nails, and mucous membranes (the lining inside the eyelids, nose, and mouth).  A dermatologist is specially qualified to treat a variety of conditions including acne, eczema, psoriasis, rashes, rosacea, skin cancer, wrinkles, age spots, and hair loss. People of all ages, from newborns to those over 100 years of age, can often benefit from regularly seeing a skilled dermatologist.

BOARD CERTIFIED

Choose a dermatologist that is board certified by the American Board of Dermatology. While technically any doctor with a medical degree can start a skin care practice, board certified dermatologists meet an additional set of education and experience criteria including

CONSIDER THE NEED FOR SPECIALIZATION

Some board certified dermatologists complete additional education and training in order to specialize in areas like Mohs surgery, dermatopathology, or pediatric dermatology. Such additional fellowship training can be extremely valuable when it comes to properly treating certain conditions. Patients who know they need a specific procedure should concentrate their search on dermatologists with additional fellowship training. Ask any candidate about their history performing the procedure including complications.

BEDSIDE MANNER

All patients deserve a dermatologist that they feel comfortable with. This means finding a dermatologist with a communication style and personality that works with yours. When reading reviews or soliciting referrals form friends ask if visits feel rushed. A good dermatologist will take the time to fully address your concerns and explain all the treatment options.

AFTER HOURS CARE

It’s important for patients to always be able to reach out to their dermatologist after office hours, during evening and on weekends. Many dermatologists will offer on-call or answering services to handle any emergencies like allergic reactions. You should never feel left in the dark on the weekend or after hours on weekdays.

Dermatologist Tips

Do you have any skin care routine for day and night? If so, you’ve probably know how to deal with several skin problems such as acne. However, there are times when you feel your skin is uneven or your pores getting enlarged.

Experienced dermatologist Adarsh Vijay Mudgil explained that skin texture is basically about how smooth your skin feels. Skin with good texture are smooth and soft when you touch it. While a bad skin texture is noticeable.

Exfoliation

Dr. Mudgil stated that exfoliating your skin regularly helps to improve your skin texture. Exfoliate the skin with a soft peeling or a cleanser. Other options is to visit your dermatologist for chemical peeling. If you prefer to exfoliate at home, use a helpful guide to find the best exfoliator for your skin types.

Try laser treatment

“Laser treatment can repairs the skin texture,” said Dr. Mudgil. If you feel that your skin texture has not improved with home treatments, it would be best if you consult your dermatologist to decide what is the best skin care for you

Keep your skin hydrated

A moisturizer can prevent your skin from dryness or excess sebum. When your skin is balanced (hydrated) your skin becomes soft and smooth

Tips to find a Good Dermatologist

The individual could have varicose veins, acne, odd mole, rash as well as other skin problems that you would like enlightenment and cure. However, you don’t be aware of steps on tips on how to actually find a good one. Below are great tips that will help you to find an excellent dermatologist which will understand your woes and give good results and medications to your skin problems.

One thing you have to do is always to ask your household doctor if he can recommend an excellent dermatologist to you. Doctors know the best doctors in different areas, and furthermore, as each of them meet at functions and conventions, he might point you within the right direction.

You may also ask your friends and colleagues once they know anything good dermatologist whom you can rely. Apart from this, you can even try Googling it and locate thousands of possible dermatologists who can meet your requirements. From here, you can check their site and create a few calls

How to Find a Good Dermatologist

Your skin is your largest organ and its health is important to your overall well-being. With so many things that can go awry with your skin, a good dermatologist is invaluable and can make a huge difference in the way you look and feel. So how do you go about choosing the right dermatologist and how do you know what to look for in a dermatologist? Here are some tips for how to find a good dermatologist that is right for you

Check Their Biography

If you’ve found a handful of dermatologists that you’re considering, take a moment to check out their bios (usually posted on their website). Look for board certification specifically from the American Academy of Dermatology

Schedule a Consultation

By scheduling a consultation, you can meet your potential dermatologist and get a feel for his or her mannerisms and abilities while also asking lots of questions about a procedure or issue you’re looking into. You may also be able to meet other patients in the waiting room and ask them about their experience with the dermatologist in question.

Listen to Learn

During your consultation with a prospective dermatologist, focus on listening. The best method is to give a vague reason for your visit and then let them do the talking. Perhaps mention the lines on your face or veins that you wish you didn’t have, but don’t go into detail about the methods you’ve researched on your own. Instead, listen to how the dermatologist would address the issues and their opinion will give you an idea for how aggressive their treatment methods are and what kind of approach they take to treating those issues

Look for Recommendations

Online reviews and recommendations can be a little misleading for some who are looking for unbiased opinions and not just the most positive reviews that a dermatologist has chosen to present on their site. Ask friends, family members, and neighbors for a recommendation for a good dermatologist in your area, or ask your general practitioner for a recommendation for a dermatologist that they like and trust themselves.

Choose Good Party Planner For Your Memorial Party

Best tips from party planning pros: how to make your event unforgettable

Rachel Senner, Senner of Attention

My best tip for creating an unforgettable event is to tie in touches that will bring everyone together. Sometimes people meet, grow closer, or bond stronger because of a fun game, touching photo slide, or song choice. These small things here and there can create a special experience no one will forget.

Megan & Cedar Watson, Paper Goat Post

Our best tip for creating an unforgettable event is to PLAN! If you think through all the details and set a solid plan, you will be able to execute the event based around the goals set during your planning. If you run into any bumps during the execution, you’ll be able to “WORK YOUR PLAN” and respond in a calm and appropriate manner.

Elle Anderson & Sydney Thompson, Elle A Events

I would say the best tip for an unforgettable event is to be ‘open minded’. Every client is different and their happiness comes first … always.

Ashley McAllister, The Party Girl

Make a killer backdrop. I have a super simple PVC pipe frame I use for pretty much everything, and you can get very creative. Use it as a showstopper behind your food table, and later on, let it steal the show on Instagram since it does double duty as a photo booth backdrop once everybody is warmed up!

Andressa Hara, Twinkle Twinkle Little Party

The best tip for an unforgettable event is choosing a unique and relevant theme that carries through the party decor and food/sweets. Creating an eye-catching set up/presentation with a story behind it will definitely give the guests something to talk about.

Tips for a Stress-Free Party

Simple Planning

Planning a party or event shouldn’t be stressful or intimidating. By staying organized and starting early, you can plan, create and host a memorable affair with ease. Download and print our detailed party planning checklist to make the process even easier, from one month before the party to an hour before your guests arrive. Photography by Michael Bullock

Get Organized

I always keep several lists that I continually update through the planning process: a master to-do list where I highlight every task that must be accomplished, a shopping list that ensures I won’t forget any supplies, and an all-important guest list where I track contact information, dietary restrictions and RSVPs

Create a Theme

Milestones like birthdays and holidays can be even more festive when a creative theme is chosen to set the tone. Transform your space into a south-of-the-border fiesta by serving margaritas and hiring a mariachi band, or throw a Great Gatsby-inspired brunch with croquet on the lawn. The possibilities are endless

Send Out Invites

Although online invitations are perfectly acceptable for last-minute get-togethers, there’s nothing quite like a mailed invitation to set the tone for a party and build anticipation for the fun in store. There are plenty of online stationery companies offering chic well-designed invitation designs, or you can get creative and make your own. A brightly colored square of card stock embellished with finds from local craft stores is every bit as special as custom invitations (and for a fraction of the cost, too)

Offer a Self-Serve Bar

The key to a simple drink service? Set up a self-serve bar so guests can be their own mixologists. Set up a pretty tray with a decanter, two or three kinds of liquor and a few festive mixers. Let everyone have fun creating their own concoctions. Welcome guests with a drink upon arrival by placing a tray of champagne and sparkling water near the door so they can grab some bubbly and start mingling as soon as they arrive.

Your Quick Guide to Becoming a Kickass Party Planner

You have a knack for throwing parties. From ingenious themes right down to the amuse bouche, ideas come to you and things just naturally flow from there. Time and again, a gathering you’ve organized has turned out to be the party of the year.

To launch a full-fledged party planning business, you’ll need to get strategic. Being a professional party planner is about a lot more than good taste and impeccable conversational skills. You also have to be a gifted multitasker, financially astute, and perhaps most importantly, ultra-calm under pressure. When the shi…ndig hits the fan, can you keep calm and party-plan on?

Upgrade your event experience

It’s the chicken/egg thing: you need experience to get jobs, but it takes jobs to get experience. Here’s how to get around this paradox.

Consider industry training

In the party planning business, official training is a nice to have, not a have to have. Experience and talent are definitely more important than training.

Put your skills into perspective

Flair for a good time aside, there are some practical traits that will make you a better party planner. A lot of these traits could work in almost any job posting. But they’re particularly true for party planning.

Ways to Simplify Party Planning

Plan Slowly

Don’t stuff a week’s worth of party planning into one stressful Saturday. “Separate the planning of each party component over a couple of days,” says Jessica McTaggart of Pink Champagne Events. Spend one evening focusing on the menu and another on your DIY centerpieces—and allow for plenty of relaxing downtime in between, if possible.

Perfect Your Guest List

It doesn’t matter if it’s an intimate dinner party or a big holiday; maintain a careful eye on your guest list—and not just to keep the headcount in check. “Make sure you have the right mix of visitors,” says Meg Stepanak of Gemini Event Planning. For an intimate gathering, she recommends inviting at least a few extroverts to “engage even the shyest guest, find common interests, and relax the crowd.”

Send Invites Early

Unless you’re secretly hoping some of your guests won’t show up, make sure to send out invitations at least six weeks early—six months if they’ll be attending from out of town, says Heidi Hiller of Innovative Party Planning. Emailed invitations, like Paperless Post, are acceptable for most events, but “the level of respect you give your guest when inviting is the level of respect you get in your attendance. Casually done, it can be ignored,” she says. Need a firm headcount? Hiller recommends formal invitations.

Stick With the Tried and Tested

“We all flock to Pinterest for the latest trends, but I don’t recommend trying something for the first time when preparing to host,” says McTaggart. When planning your menu or decorations, make sure to pick recipes and DIY projects you’ve successfully completed before—otherwise you might find yourself up to your elbows in glitter and stress three hours before your party.

Consider a Buffet

Even for professionals, menu planning can be a struggle—so why not consider a buffet? “A buffet menu allows guests to build their own plate,” says Stepanak, meaning they can pick their favorite mains and skip their least-favorite greens. And don’t force yourself to work in the kitchen all day before the party: prepare appetizers and salads ahead of time.

Here’s What Makes a Great Party Planner

They love people

While every party planner should have a good amount of event experience, no amount of mastery can compensate if the person isn’t pleasant to work with. Eventbrite’s Ronnie Higgins reminds event planners in a recent blog post that their people skills should be number one. He explains that to successfully work with a wide range of people, a planner needs to be able to quickly resolve conflicts, be a confident but pleasant negotiator, and have a sense of humor.

They’re organized

Let’s face it: Party planners are often so crucial because there’s just so much planning to do! Even if you’re naturally organized and a master of systems and checklists, a great planner should have processes in place that top even your best DIY ideas.

They track stats and data

Did you know that event planning software and analytics tools are a big market for event planning professionals? Many of today’s top planners use some form of data products to keep them on budget and on time.

They take their work seriously

Even if you find out about a party planner from a referral or mutual friend, it’s wise to take the time to research their business and ensure they do things like a professional. Start with their website or social media platforms to see how they communicate. Look to see that they have more than one way to reach them. Can you call? What about text or email?

They can provide references

More than just online reviews, a seasoned event planner will likely have references who can speak to their work. To take things a step further, it might also be helpful to ask if they have references that aren’t just former clients.

Must Know About Take Eye Care For Your Eye

Take Care of Your Eyes Now For Good Vision In Later Life

Is the If you’re in your 20s or 30s, you probably don’t spend much time thinking about your eye health. But this exactly the time you should be acting to preserve your vision. Most vision problems are preventable with simple good-health habits. 

Vision loss is not an inevitable part of getting older. Many studies have shown that exercise and a diet rich in a variety of fruits and vegetables can protect against blinding eye diseases, such as age-related macular degeneration and glaucoma. But you can’t wait until you’re having problems with your vision to start taking care of your health.

The choices you make while you’re healthy can also help prevent certain types of eye cancer, as well as work- and sports-related eye injuries. And regular eye exams can catch problems before it’s too late. The American Academy of Ophthalmology recommends adults under age 40 have a comprehensive medical eye exam every five to 10 years.

Make these seven habits part of your daily life to set yourself up for a lifetime of seeing well:

  • Wear sunglasses (even when it’s cloudy). Long-term exposure to the sun without proper protection can increase the risk of eye disease, including cataract, macular degeneration, growths on the eye, and a rare form of eye cancer. Wear sunglasses that block 99 to 100 percent of both UVA and UVB radiation.
  • Exercise. Regular physical activity can protect you from serious eye diseases, such as age-related macular degeneration and glaucoma.
  • Stop smoking. Smoking increases the risk for eye diseases such as cataracts and age-related macular degeneration. Smoking also raises the risk for cardiovascular diseases which can indirectly influence your eye health. Tobacco smoke, including second-hand smoke, also makes dry eye worse.
  • Protect your eyes at work and at play. Every year, thousands of people in the United States get a serious work-related eye injury or sports-related eye injury. Wearing protective eyewear (safety glasses or goggles) can prevent most of these injuries. To make sure you have the right kind of protective eyewear and you’re using it correctly, talk with your eyecare professional. 
  • Be aware of eye fatigue. If you spend a lot of time at the computer or staring at your phone, you may forget to blink — and that can tire out your eyes. Try using the 20–20–20 rule throughout the day: every 20 minutes, look away from the screens and focus about 20 feet in front of you for 20 seconds. Eye fatigue won’t damage your vision, but if it persists, it can be a sign something else is wrong. You may have dry eye, presbyopia, or spectacles with lenses that are not properly centered.
  • Take proper care of contact lenses. Sleeping, showering and swimming in contact lenses increases your risk for a potentially blinding eye infection. Learn how to properly care for contact lenses.
  • Know your family history. Certain eye diseases can be inherited. If you have a close relative with macular degeneration, you have a 50% chance of developing this condition. A family history of glaucoma increases your glaucoma risk by four to nine times. Talk to family members about their eye conditions. Knowing what vision challenges your family has had can help you and your ophthalmologist evaluate your risk.

Eye Health = Brain Health

Healthy brain function needs healthy eyesight. The brain is our most vital organ, allowing us to live complex lives. Considering that your optic nerve connects your eyes and your brain, a healthy co-dependent relationship is necessary. By keeping your eyes healthy, you keep your brain healthy – improving your overall quality of life!

Good vision contributes to improved athletic ability, better driving skills, improved learning and comprehension and better quality of life.

What to do

Specific vision problems can benefit from specific solutions, according to the AOA:

  • Sensitivity to bright light. Choose sunglasses that block 75% to 90% of visible light. In addition, sunglasses that block 99% to 100% of ultraviolet A and B radiation help protect against cataracts. Choose sunglasses that also block the blue wavelengths. Don’t wear dark glasses at night or indoors. Doing so can make eyes more light sensitive over time.
  • Itchy, burning or red eyes. These symptoms can result from dry eye conditions common after age 50, or from high mucous production in allergy-prone contact lens wearers. Using artificial tears may help with dry eye. Some allergy sufferers can get some help from switching to disposable or daily wear lenses. Contact lens wearers and adults older than 50 with these symptoms should consult an eye care professional for appropriate treatment.
  • Trouble with glare. If nighttime headlight glare is an ongoing problem or if you work in visually demanding situations, ask your eye care professional about antireflection-coated lenses. These can help reduce glare and reflections both day and night. Remember, for older adults, an increased sense of glare may be a symptom of beginning cataracts and a reason to get an eye exam.
  • Reduced vision in aging eyes. In addition to a new eyeglass lens prescription, a helpful measure for older eyes is to place more lamps in the home and install task lighting. Choose high-output fluorescent bulbs to increase light output while decreasing energy usage. Eliminate glare with indirect lighting.
  • Problems with new glasses. If, after a few days of wearing new lenses, you continue to have blurred vision, double vision, or other problems, see your eye care professional. The problem may be solved by an adjustment to either the frame or the prescription.
  • Annoying spots in front of your eyes. Generally, seeing spots or floaters is a common, harmless experience of aging. Seeing flashes, or, in some cases “floaters,” however, may signal something more serious like diabetic retinopathy, carotid artery disease, or early-stage retinal detachment. Call your healthcare professional if you have symptoms.

Foods That Are Good for Your Eyes

Dark, Leafy Greens

Kale, spinach, and collard greens, for example, are rich in both vitamins C and E. They also have the carotenoids lutein and zeaxanthin. These plant-based forms of vitamin A lower your risk of long-term eye diseases, including AMD and cataracts. Most people who eat Western diets don’t get enough of them.

Raw Red Peppers

Bell peppers give you the most vitamin C per calorie. That’s good for the blood vessels in your eyes, and science suggests it could lower your risk of getting cataracts. It’s found in many vegetables and fruits, including bok choy, cauliflower, papayas, and strawberries. Heat will break down vitamin C, so go raw when you can. Brightly colored peppers also pack eye-friendly vitamins A and E.

Salmon

Your retinas need two types of omega-3 fatty acids to work right: DHA and EPA. You can find both in fatty fish, such as salmon, tuna, and trout, as well as other seafood. Omega-3s also seem to protect your eyes from AMD and glaucoma. Low levels of these fatty acids have been linked to dry eyes.

Sweet Potatoes

Orange-colored fruits and vegetables — like sweet potatoes, carrots, cantaloupe, mangos, and apricots — are high in beta-carotene, a form of vitamin A that helps with night vision, your eyes’ ability to adjust to darkness. One sweet potato also has more than half the vitamin C you need in a day and a little vitamin E.

Lean Meat and Poultry

Zinc brings vitamin A from your liver to your retina, where it’s used to make the protective pigment melanin. Oysters have more zinc per serving than any other food, but you don’t have to be a shellfish lover to get enough: Beef, pork, and chicken (both dark and breast meat) are all good sources.

Eggs

It’s a great package deal: The zinc in an egg will help your body use the lutein and zeaxanthin from its yolk. The yellow-orange color of these compounds blocks harmful blue light from damaging your retina. They help boost the amount of protective pigment in the macula, the part of your eye that controls central vision.

THE WORST FOODS FOR YOUR EYE HEALTH

You know the saying, “You are what you eat”? The food you eat plays a huge part in your health.

Our eyes are vascular, meaning that it is important to have a heart-healthy diet to keep the blood vessels that service our eyes healthy. Tiny capillaries provide your retina with nutrients and oxygen; because these vessels are so small, fatty deposits can easily cause blocked veins.

list of the foods that are harmful to the health of your eyes.

CONDIMENTS, TOPPINGS, AND DRESSINGS

The toppings that you likely store in your refrigerator door like mayonnaise, salad dressing, or jelly, are all high in fat.

Rather than using these options for flavor on your next sandwich, burger, or salad, try using natural flavors like green vegetables or toppings that are packed with vitamin C, like a squeeze of fresh lemon. Get great flavor with natural foods without sacrificing your nutritional benefits!

WHITE OR PLAIN COLORED FOODS

Think about the white foods that you eat: pasta, white bread, rice, and flour tortillas. These foods offer almost no nutritional benefit, just simple carbohydrates that give a rush of energy that are followed by a crash.

If you are eating these foods, be sure to add greens and foods that rich with omega-3 to the meal to provide yourself with nutritional benefits. Or, swap them for healthier alternatives that use whole grains.

FATTY MEATS

Red meats and sausages are often convenient to purchase, especially when you are buying from the deli. Lunch meats can seem healthy but are mostly full of chemical preservatives, salt, fat, and cholesterol.

Instead of consuming fatty meats, try adding in lean meats like fresh turkey, which is full of zinc and protein. Salmon is good alternative as well, as it is an omega-3 rich food.

MARGARINE

Margarine is often marketed as a healthy alternative to butter, but is full of trans fats that can adversely affect your cholesterol.

Instead, try using coconut, avocado, or olive oil as an alternative to both margarine and butter to avoid trans fats.

UNSATURATED FATS

Junk foods are delicious but can cause serious issues down the line for your health if you consume too many. Rather than eating French fries, cookies, or potato chips, which are all full of unsaturated fats, swap them out for healthy saturated fats.

Lean meats, fish, fresh fruits and veggies, and low-fat or non-dairy products are the best way to receive healthy fats.

Use Tax Planning To Set Your Company Tax

The Importance of Tax Planning During the Year

What is Tax Planning?

Tax planning is a way to find out how much money you are paying on tax and also a way to help minimise the tax liability (the amount owed to tax authorities) through the use of allowances, deductions, exclusions and exemptions. Tax planning can be used in a number of ways; for example for retirement, businesses, Wills, and properties.

Types of Tax Planning

There are a few different types of tax planning that are useful for individual people, companies and organisations. Some of the tax plans include; short term tax plans, long term tax plans, permissive tax plans and purposive tax plans. The short term planning allows you to reduce taxes at the end of the income year. Long term plans allow you to plan at the end of the beginning or end of the year, permissive tax plans are permissible under different law provisions. The purposive tax plan gives you the chance to make different investments.

How It Works

When you start tax planning, you can find many guides online and you can also speak to financial advisors and solicitors to help get you started and give you all the important information that you will need to know. For example, each person has an inheritance tax allowance up to £325,000 with anything over the threshold being charged at 40%. So, if an estate was valued at £400,000, only £75,000 of that would be taxed. Since the majority of people won’t leave an estate over this amount, most feel they don’t need to know about inheritance tax. However, actively considering it and your future can help you to avoid any nasty surprises later on.

Taking tax-efficient decisions

There’s more to tax than investments. It affects every single aspect of your life—from salaries and income sources to expenditure to financial decisions. And this is a key aspect of tax planning—it helps you make decisions that lower your tax burden.

For example, let’s say you have to choose between two investment options. A tax planner helps you choose the best option while keeping in mind both returns as well as tax efficiency. Another example is ensuring your income is structured in the most tax-efficient way.

Tax audit and filing

The last key aspect of tax planning is the actual tax filing. This is when you take into account all aspects of your finance—income, expenses, debt, and investments—and then calculate your tax liability. Then, there’s all paperwork and documentation involved in paying your tax and filling your tax returns.

What makes tax planning important

Taxes are one of life’s certainties, and no one likes giving up some of their hard-earned cash. With proper tax preparation, however, it’s possible to pay less in taxes or receive a larger refund at the end of the year. While paying taxes is inevitable, there are several ways to diminish your tax burden and end each year with more money. Proper tax planning makes it easier to build your personal finances and afford the things you want.

Additionally, by anticipating taxes when you create your financial plan, it’s possible to significantly boost how much money you will have in retirement. Many elements of tax planning are quite simple, but it’s always worth speaking with a professional at a local bank who can offer additional guidance on how to successfully work within the tax system.

A tool for retirement

Saving for retirement is difficult under any circumstances, and it can be even harder to set money aside after taxes. Luckily, many retirement savings options allow you to set money aside without paying taxes on that income. Once that money has been placed in a separate account, it can gain value based on interest or investments. You will not be charged taxes on that money until you remove it from the retirement account. By that time, it’s likely you’ll be in a lower tax bracket and need to pay significantly less, according

.

Take a long-term approach

Tax planning offers short and long-term benefits, but you’ll want to take a long view of your financial situation to maximize savings. If you anticipate an increase or decline in your income during the next few years, start catering your financial plan to the upcoming shifts ahead of time, according to CNBC. Figure out if it’s best to pay taxes on that increased income right now, or if you should try and put it all into tax-deferred accounts that may incur taxes later on.

Consider every part of your financial life

Taxes affect so many parts of your life that you may forget different ways to save. If you fail to consider the tax implications of a big financial decision, you could end up wasting a lot of money. The tax laws surrounding home sales can be particularly painful for uninformed buyers and sellers,  For example, people can get an exemption on capital gains taxes on a home sale if they file jointly with a spouse.

This can result in massive savings for couples, but far too many people fail to consider this factor when they list their home. By speaking with a financial professional before taking any financial action, you can prevent yourself from accidentally missing out on significant tax exemptions.

Go itemized or standard

Whenever you file your taxes, you have the option between taking the standard deduction given to all filers or creating a custom deduction by listing your expenses for the year. Either option can offer better savings, depending on your financial situation, so you’ll want to evaluate exactly how your financial life changed during the past 12 months. With proper tax planning, you can make your financial life much easier and pocket additional money along the way.

Objectives of Tax Planning

Minimal Litigation: There is always friction between the collector and the payer of tax. In such a situation, it is important that the compliance regarding tax payment is followed and used properly so that friction is minimum.

Productivity: Among the most important objectives of tax planning is channelization of taxable income to various investment plans.

Reduction of Tax Liability: As a tax payer, you can save the maximum amount from payable tax amount by using a proper arrangement of your enterprise working as per the required laws.

Healthy Growth of Economy: The growth in an economy depends largely upon the growth of its citizens. Tax planning estimates generation of white money that is in free flow.

Economic Stability: Stability is supplemented when the tax planning behind a business is proper.

How to get tax planning right

It is easy to get DIY tax planning wrong, especially with the regulatory goalposts changing all the time. Expatriates have the added complication of having to deal with the tax rules of more than one country at a time when global tax scrutiny is at its highest. Getting it wrong can not only lead to an unwelcome and unexpected tax bill for you or your heirs, you could end up facing a tax investigation.

It is important to make sure your tax planning is not done in isolation or as an afterthought – it should be a fundamental part of your investment, pensions, estate planning and overall wealth management approach. Be sure to schedule regular reviews so you can adjust your arrangements to keep up with any life changes or tax reforms that may affect you, including new opportunities.

For the best results, talk to an adviser with in-depth understanding of cross-border taxation, including how the local tax regime interacts with UK rules. As well as offering peace of mind that your tax and wider financial planning is compliant in your country of residence, they can ensure it meets your income needs and goals in the most tax-efficient way today, without burdening your family with unnecessary tax headaches in the future.

Remake Your Bathroom With Bathroom Remodelling Metode

Should You Do Your Own Bathroom Remodeling?

Even seasoned DIYers gulp and take a deep breath when considering tackling a bathroom remodeling job. Other than perhaps a kitchen, no project is more involved in terms of the systems and skills involved. Bathroom remodeling is all about plumbing, electrical, and tile work—all highly skilled trades. It’s dense, tight work, too, where every square foot counts. And then there are the frequent surprises, such as when you find rotting subfloor and joists below a leaky shower or cast iron plumbing stacks that have rusted to the point of crumbling. And finally, there is the time pressure. A bathroom is an essential space, and a DIYer is under great pressure to get the room remodeled and back into service as quickly as possible.

But there’s one real (and very important) reason why you wouldn’t hire professionals to handle your bathroom remodeling job: money.

Choosing a Project Manager

So, who is in charge of your bathroom project, anyway? That depends on the scope of the project and your goals for the outcome. You may opt to work with a licensed bathroom designer (often they also specialize in kitchen designs). A general contractor or architect may act as the lead/project manager—or the designer may have a project manager on staff that sees through the project. Designers themselves also serve as project managers, ensuring that the process goes according to plan and keeping open lines of communication.

The Home Team

Your bathroom renovation project will require a band of professionals—tradespeople, contractors, designer(s) and someone to oversee the project (other than you). While you can certainly serve as the general contractor on the project, it’s a lot more difficult than it may initially seem to coordinate a bathroom project.

When hiring a designer, general contractor or any professional, be sure to do your homework. Consult with family and friends to get recommendations. Find out what certifications they hold. If a designer does both kitchen and bathroom design, find out which area is his or her strength.

7 Mistakes Not to Make in Your Bathroom Remodel

Whether you are just replacing an outdated vanity or renovating the entire space, bathroom remodeling can be an expensive proposition. Read on to find out the 7 most common mistakes made during a bathroom renovation and how you can avoid them in your own home

Ignoring the Bathroom Fan

Don’t forget about this often-overlooked feature: an appropriately sized bathroom exhaust fan. Without proper ventilation, humidity gets trapped in the enclosed space. Over time, this moist environment becomes the perfect home for mold and mildew, and allows paint, grout, and metal to deteriorate.

Lacking a Clear Plan

Planning is everything! Instead of discovering your bathroom’s specific needs after you’ve already ripped out the toilet, make a plan that takes into account precise measurements, anticipated cost, all materials, and your own personal taste. Map out your plan for any family members or contractors who will be helping you with the remodel.

Improper Spacing

If your plan for your bathroom renovation focuses on looks rather than function, that’s a big problem. Leave the decorating for later and think about the layout and spacing first. If you’re breaking down walls and moving plumbing fixtures, you’ll not only want to make sure the new layout satisfies building codes for minimal spacing guidelines, but also be certain that the placement of fixtures and furnishings allows for comfortable everyday use

Choosing the Wrong Materials

Bathrooms undergo some serious stress—from high moisture levels to quick temperature shifts. To prevent warped or mildewed floors, walls, or vanities, you’ll want to choose materials designed specifically for the bathroom.

Being Unrealistic About a Budget

Be honest about the budget. If you have only a limited amount of money to work with, stick to what you can afford. If you overspend, you’ll have to cut corners somewhere and won’t be pleased with the results. Extra costs do arise, however, so err on the safe side by budgeting an extra 15 to 20 percent for surprise expenditures.

Overlooking Small Mistakes

Small glitches in a new tile job or a gap in a bathroom vanity might seem minor, but even the smallest errors will become eyesores down the line. As your renovation progresses, always fix mistakes, even the smallest ones. Don’t persuade yourself to overlook work that’s been done wrong—if you notice it now, you’ll see it every time you use the space.

Losing Focus Toward the End

Any renovation is exciting in the beginning, but hard work and long hours cause most people to lose a little steam. If you’re so eager to see the completed room that you start rushing, you can burn out. Instead, move at a steady pace at the beginning, then slow down at the end to be sure everything is done correctly. Patience definitely pays off.

Inexpensive Bathroom Remodeling Ideas       

Limit Your Tile

Tile gets expensive, especially when you hire a contractor to lay it all out for you. To save money, limit the amount of tile and focus on high-impact areas like the floor (instead of the floor and inside the shower stall walls). Alternatively, you could tile one horizontal strip along the wall and paint the rest.

Save on Counter Tops

Another way to save on granite countertops is to buy a slab containing imperfections. The more visible the imperfection, the cheaper the price will be. Keep in mind that your sink basin will take up a lot of surface area, so if the imperfection is located where the sink or faucets will be then you won’t see it anyway!

Paint

If you don’t have a lot to spend, then repainting will be the cheapest and, perhaps, the most effective way to give your bathroom a new look.

Update Fixtures

Next, look at the little details. You can update light fixtures, sink faucets, towel racks, and drawer pulls for a relatively small investment. These items may seem insignificant, but updating them can make a big difference in your bathroom’s look. Check out sites like ModernBathroom.com for ideas. The items may be out of your price range but you can find ways to replicate the look for less.

How to Remodel Your Bathroom From Start to Finish

A bathroom makeover is an easy way to spruce up your home. But before you start taking measurements for an open shower, you should take the time to plan out your bathroom renovation step-by-step so you know exactly what you’re getting into.

Steps to Remodel a Bathroom

1. Remove or Demolish Bathroom Fixtures

Assuming you’re partially or totally renovating your bathroom, this is where you’ll start removing drywall and any fixtures you’re replacing. Remodeling a bathroom yourself isn’t all that hard, but there are a few steps you should follow to avoid any costly mistakes during the demolition phase.

2. Install Your New Shower or Tub Basin

After you’ve gutted your bathroom, its time install your new fixtures. For a shower or tub replacement, you’ll want to pick a pan or basin that fits your new decor, as well as the space where your current tub sits.

3. Install New Fixtures and Features

With the shower out of the way, you can now install your new vanity and cabinets. If their dimensions are bigger or smaller than your current ones, you’ll need to renovate your bathroom a little further by adjusting the wiring.

4. Lay Down Your New Floor Tiles

A DIY bathroom makeover is not complete without new floor tiles. But before you start grinding away with the grouting, use a mason’s chalk line to mark reference lines perpendicular (at a 90-degree angle) to the wall with the longest continuous line. This will allow you to keep your tiles in a straight line, avoiding the dreaded crooked tiling job.

5. Hang New Drywall and Start Painting

Now your bathroom makeover is starting to take shape. The next step is to hang your new drywall. This can be a long process as you have to cut new drywall to fit around your vanity and any other features. But once you start nailing up the boards you should be able to move briskly.

6. Install Your New Vanity and Cabinets

After you’ve taken care of the walls and finished installing any new lights, it’s time to install the vanity, cabinets and anything else that’s on your bathroom remodel punch list.

The first thing you want to install is the vanity, including the sink and faucet. Once you have the drain hooked up to the faucet, you can move on to the other essentials such as the mirror, cabinets and the trim around the shower or tub.

7. Finish Hooking Up the Plumbing

At this point in the process, your bathroom actually resembles a bathroom, except for one thing: the toilet. You could install or re-install your toilet earlier in the process but leaving it for last helps avoid chipping it while working on other areas of the bathroom.

Add the Finishing Touches to Wrap Up Your DIY Bathroom Remodel

The last finishing touch is to install the trim around the room and mirrors. The trim is the capstone for every bathroom remodel as it provides the last bit of detail your bathroom needs to feel complete. But of course, the real last step in any bathroom makeover is to draw a nice hot bath for yourself after all your hard work. You deserve it.

Tips To Make A Good Coating For Epoxy Flooring

Things You Need to Know About Epoxy Floor Coatings

What is Epoxy?

Epoxy is an adhesive, paint, plastic, or other material that is created as a polymer of epoxides. The term “epoxy” is used to describe coatings that are created from two components, meaning, a combination mix of two different chemicals, referred to as “resin.” This classifies epoxy as a copolymer. Chemically, resin is composed of short chain polymers, which at their end contain an epoxide group.

There are many benefits that come with using an epoxy floor coating, compared to using other types of resins for flooring. Most importantly, epoxy is known to be the highest strength resin in the industry. They offer the strongest bond between the resin and reinforcement and allow for the construction of the lightest part and most durable modules.

Epoxy is typically chosen for its excellent mechanical properties and its dimensional stability. When properly cured, epoxy flooring offers good chemical and heat resistance, and extremely low shrinkage. Epoxy resins are an excellent option for repairs, since they bond to dissimilar materials and previously cured materials. Most epoxy resins can be post-cured with heat to improve their strength, service temperature and dimensional stability. Parts should be cured at a temperature that matches or exceeds their maximum service temperature; otherwise the epoxy might warp or distort. The bonding of epoxy paint offers a strength that cannot be matched by other common materials, such as vinylester or polyester.

Damage resistant

The epoxy flooring is resistant to wear, cracking, peeling, and corrosion. It can resist damage from chemical like acids and other environmental degradation.

Cured epoxy is able to resist moisture. Epoxy on its own may not be UV resistant. However, adding epoxy coating will help floor last longer and make it even scratch resistant due to composition of the ingredients.

Urethane and a other variety of top coatings can make epoxy flooring more abrasive and scratch resistant. Long term curing, may even make it gasoline . Heated healed or cured floor will also make the epoxy floor more heat resistant.

Epoxy’s Strength Comes from Its Chemical Bond

An epoxy coating is made up of two parts—a polyepoxide resin and a curative. They are mixed immediately before they are applied to your floor, and the resulting reaction causes them to chemically bond to one another and to the floor itself.

This makes for a coating that is stronger than the sum of its parts. Epoxy is extremely durable and won’t peel or chip away from the flooring surface—that is, as long as it was cleaned and prepared properly beforehand.

Surface Prep Is the Most Important Part

You can read all about the surface prep process on our in-depth page, but suffice it to say that lazy or improper surface preparation means your epoxy floor could fail almost instantly.

One of the worst culprits is moisture. High humidity or vapor permeating the concrete flooring can prevent the adhesive bonds from forming while severely slowing the curing process. This is why it’s vital to get a professional moisture test done first, and have any problems dealt with before applying an epoxy.

Epoxy Primer Formulas

Depending on the product being applied, you might need to apply an epoxy primer and finisher coat. The primer is applied just like paint and is allowed to settle for several hours before the epoxy goes on. To apply the primer, cover the floor with a thin layer of water, then spread the primer with a roller pin on a pole, spreading it out in a thin layer over the entire floor. Let the primer dry, then apply a second coat. The finisher is applied in the same manner as the primer but without the water layer.

Battle of the Floor Surfaces: Which One is the Strongest?

If you’ve ever purchased a new floor for your home, you’ll always hear the salesperson talk about the strength of the floor surface. That’s because some materials are much stronger than others. Take carpet, for example. This surface withstands footfall in a bedroom or lounge, but it won’t be suitable for your garage floor. It’s just not strong enough.

Then there’s hardwood. Again, these floors make brilliant additions to other rooms in your home, but they just don’t cut it when it comes to your garage. Hardwood can break down over time and lose its strength. This is a big no-no if you want a garage floor that will last you for years and years to come.

Epoxy floor coating, on the other hand, is strong enough. You can often find this surface in industrial environments — big car plants and retail warehouses where hundreds, perhaps thousands, of people work.

Epoxy flooring may not be something that you’ve heard of before but in its simplest definition, it is a flooring surface that is made up of multiple layers of epoxy that is applied to the floor to a depth of at least two millimeters

Make A Good Ceiling For Your Living Room

How to Efficiently Install Ceiling Medallions

What Are Ceiling Medallions?

Ceiling medallions are decorative disks that are attached to the base of a ceiling lighting fixture. These ceiling additions are generally circular and  include floral patterns, flowing curves and other decorative features.

Originally (from the early 1700s through the early 1900s), ceiling medallions were used for mainly safety reasons as they protected ceilings from candle burns. They were especially loved by the Victorians who cherished a ceiling medallions deep relief patterns and detailed ornate features. While they were once used for practical purposes, today they serve a decorative role.  

Gather Tools and Equipment

Before you get to work, you’ll need to select a ceiling medallion that works with the room. Choose one that’s the right size compared to the total square footage of the space, ideally with a ratio of about 1-7. If you aren’t sure whether the medallion you’ve been eyeing will work with the space, try creating a paper or a cardboard cutout and testing it out in the room. The ceiling height can affect how well a medallion fits the space, so don’t hesitate to go bigger in a room with high ceilings.

Once you’ve decided on the perfect decorative element, take a few minutes to gather all the tools and equipment necessary for this DIY project. You’ll need the following:

What You Need

  • Polyurethane ceiling medallion
  • Wire nuts
  • Drill and large bit
  • Drywall saw
  • Sandpaper
  • Long threaded bolt (optional)
  • Paint for touch-up and finish
  • Adhesive caulk
  • Trim-head screws

Find out how to install a ceiling medallion in six simple steps.

Step 1: Remove and Clean

Shut off the power to the light that you’re removing and take down the fixture. Cover all wire ends with wire nuts. Thoroughly level and clean the ceiling where you will hang the medallion.

Step 2: Measure Medallion Hole

If your ceiling medallion doesn’t have a hole, you’ll need to create one for the light fixture. That hole will allow you to pull the light fixture’s electrical wiring through, but it should be small enough to hide the wiring. Measure the light fixture’s cover plate, and transfer that measurement to your medallion. Draw a second circle approximately 1/2 inch smaller inside the first circle. This is the hole you’ll to cut.

Step 3: Cut Medallion Hole

Using a large bit, drill a hole in the center of the medallion to provide access for the drywall saw. Insert the drywall saw into the drilled hole and cut along the small circle you just drew. Sand the hole edges smooth. Then check that the light fixture’s threaded bolt is long enough to reach past the ceiling medallion. Use a longer threaded bolt if it’s not.

Step 4: Prep Medallion

Paint or finish the medallion as desired. Apply adhesive caulk to the back of the ceiling medallion; center and attach to the ceiling.

Step 5 : Caulk Around the Medallion

After you’ve placed the medallion, you’ll need to touch up both the decorative element and the ceiling. First, apply a small amount of caulk on top of each screw, and allow the caulk to dry. Next, check for exposed areas between the ceiling and the medallion. If you noticed any, apply a bead of caulk all the way around the medallion to eliminate voids. Be sure to smooth the caulk after application. When the caulk over the screws has dried, paint over it to create a flawless surface on the face of the medallion. Use the paint to touch up any additional areas on the medallion or on the ceiling.

Step 6: Secure Light Fixture

Reattach the light fixture. Turn the power back on.

There is a common opinion that exists that ceiling medallions, as well as other decorative architectural elements in the room, have to be painted white. This point of view is not always correct. You should coordinate colors of the ceiling medallions and other decorative architectural embellishments with the overall color theme of the room.

If ceiling medallions are used in traditional decor, the details can be highlighted in a tone down paint, creating a subtle tone-on-tone effect. An interesting effect can be achieved on the ceiling medallions that are molded in deep relief using a “dry brush” technique when you go over base color with dry brash using deeper color.

If you want to achieve a bolder effect, you can highlight ceiling medallions design with gold, bronze, silver, or brass paint. If ceiling medallion is used along with a lighting fixture, the decision of the metallic paint choice should be based on the kind of finish metal part of the chandelier or other lighting fixture has.

Faux finishing of ceiling medallions and other architectural elements now is very popular. Ceiling medallions can be faux finished using an antiquing technique, or they can be finished to look like wood, stone, leather, or even fabric.

Ceiling Medallions Finishes

Verdigris

Metals such as bronze, copper, brass, steel, and lead naturally tarnish and corrode with time. Verdigris is an excellent finish for creating the illusion of distressed metal or oxidized copper. Faux verdigris imparts an aura of antiquity to architectural details and ceiling medallions. 

Applying this technique to a ceiling medallion is a great way to complement a chandelier or lantern which has this “rustic” detail applied or has naturally tarnished with time.

Metallic Finish

Allow this distinctive and fashionable finish to be the center of attention in any room. Using all architectural products, you can design and compliment a complete room using this bold technique. 

Make your job of finishing even more effortless by not having to worry about pre-treating or priming any of our ceiling medallions before you begin. This technique fits any style of decor, from contemporary to antique applique.

Stenciling

Stenciling offers a quick and simple way to add pattern to any painted surface. Apply decorative stencils to ceiling medallions to complement and accent any room. Precut stencils are available in myriad styles – the options range from traditional Early American to sophisticated to whimsical. 

With typical stenciling folk art form, you can match any of our architectural products. Tie your entire room together from your rug right through to your furniture.

Decoupage

Decoupage, derived from the French word “decouper,” meaning to cut out, is the creative art of pasting, assembling and varnishing paper cutouts for accenting objects.

Combine this wonderful detailing and whimsical finishing option with other methods to create an even more unique effect. The decoupage artist is limited only by his or her imagination.

Marbleizing

Faux marbling brings out the lavish details of the ceiling medallions. Create an elegant feel by marbleizing your ceiling medallions to match your floor or to create a conversation piece which draws the attention of your guests..

Marble is an intricate pattern stone. Re-creating it requires some skill and judgment but is not as challenging as you might think. Remember, base coats are easily applied directly to any of our ceiling medallions because of their pre-finished treatment..

How to Choose the Right Ceiling Medallion

Choosing the right ceiling medallion for your room involves considering both the size proportions and the decorating style of your room.

Sizing Considerations

When choosing a ceiling medallion for your home, numbers play an important role, since the proportions of the medallion must be in the proper ratio to the room size.

Here’s how to choose the correct size:

Measure the width and length of the room.

Multiply the numbers to get the square footage of the room.

Divide the number by 7. This number is the proper diameter in inches of your ceiling medallion.

This is not a hard and fast rule since the size of the light fixture also plays a role. Generally speaking, aim at sizing the medallion so it is roughly the same diameter as the chandelier. But in very ornate rooms with lots of trim moldings, the medallion can be larger in diameter than the chandelier. In smaller, plainer rooms, it’s appropriate to size the medallion so its diameter is less than that of the light fixture.

Style Considerations

While medallions are in general most appropriate for large, ornate rooms, within that general recommendation you have dozens of options—from simple disc medallions that are well-suited for Colonial-style homes to intricately shaped designs that work best in homes with the feel of an Italian villa or French chateau.

Designers usually recommend using the shape and style of other room elements to help guide your choice of ceiling medallion. Crown moldings and chair rail moldings, in particular, may give you clues as to the best patterns for a ceiling medallion. Remember that the medallion is an architectural feature and should be matched to the style of the room. If the other moldings or trim work in the room have identifiable motifs, try to match these in your ceiling medallion.

Tips To Find The Best Post Construction Cleaning

Post Construction Cleaning For Your New Home Or Office

MOVE DUST BECAUSE YOU CAN MOVE

Have you just completed a home improvement project and found yourself in a mess? Home construction can be quite stressful without having to deal with the post-work chaos it leaves behind. A post-construction cleaning service will help your house make the transition from a construction site to a guesthouse.

They offer a variety of services and programs that can conquer all your post-construction needs. Be it a quick cleaning or a more detailed, thorough cleaning, their cleaning experts have the experience, equipment and processes that will make your home look like nothing has happened.

Some of their services include:

  • Clean the dust, dirt, stains, and blisters from the wall
  • Clean all surfaces, wood and equipment, including ceiling fans
  • Clean trim, baseboard, window frame and door frame
  • Clean the brick interior
  • Remove the sticker from the window and glass
  • Clean window curtains, inner cabinets, and inner cabinets
post construction cleanup for your residence

Post Construction Cleaning Process

Just as no two construction jobs are the same, no two cleaning jobs are either. Therefore, most services change their process to best meet your needs. However, there are generally some guidelines that they follow.

This may include a rough clean, which takes place during the construction before the finish work is complete. This can include cleaning plywood 2 or concrete floors prior to the new flooring going down or scrubbing walls and preparing surfaces. Some rough cleans also are done at the end of construction and involve the removal of any trash, debris, or hazardous substances. Not every construction clean needs a rough clean, but many do to some degree.

The interior finish clean is next and, generally, involves cleaning all surfaces in and around the construction zone. This includes vacuuming and dusting all surfaces, such as baseboards, the interiors and tops of cabinets, and furnishings. Bathrooms, countertops, and cabinets are all cleaned from top to bottom. If your service includes windows, these are thoroughly washed as well. Caulk 3 and sealants are usually checked and may be cleaned if spills occurred.

Sometimes an external finish clean is also included. This involves cleaning the exteriors of windows, removing things like nails or debris from around the home, and making sure that all caulk 3 and paint is cleaned up and finished. If you only had interior work done, this phase may not be necessary.

THE POST-CONSTRUCTION CLEANING CHECKLIST

  • Cleaning mountains of dust
  • Cleaning interior glass
  • Cleaning the lights
  • Cleaning and dusting the vents
  • Spot cleaning walls
  • Cleaning cabinets
  • Vacuuming carpets
  • Comprehensive mopping
  • Cleaning and polishing restroom fixtures
  • Cleaning up construction debris

After the Dust Settles: 10 Tips on Post Construction Cleaning

Whether it is your plan to remodel a retail space, building a new home, or finally building your own commercial property from the bottom up, nothing is better than that “final day” of construction.

1) Dealing with all of the contractor leftovers

What a mess. It looks impossible, doesn’t it? The first step is a serious session of trash patrol. There is lumber, drywall, and garbage everywhere. Take a walk around and notice both the interior and exterior areas. Keep your eyes open for plastic tarps, tape, drop cloths and construction supplies like nails, screws, staples, bolts, etc. The crews aren’t trying to make your life difficult by making a huge mess, but still, be prepared to pick up a lot of trash and debris during this first step of post construction cleaning.

2) Hard floors – making them presentable again with post construction cleaning

Inspect the floors. You’re going to be appalled, but don’t worry. It can be cleaned. All construction work is messy and the flooring seems to always take the brunt of the mess. Check them for any damage, then start mopping, waxing, polishing and buffing. If you should run across any wood damage, get back with the contractor and ask for it to be repaired.

3) Rescuing your carpets from traffic, dirt, and grime

Carpet fibers will trap all of the fine wooden splinters and all of the dust. That’s not to mention the smell. You will need to use an industrial shop vacuum to get the grounded dirt and other objects out. After a good vacuum, shampooing will be in order. Steam cleaning might even be necessary. Be sure and allow for all the treated carpets to thoroughly dry before they are reopened to any foot traffic.

4) Walls and baseboards

The walls and baseboards are going to get hit and scratched during construction. There’s no way to avoid it. Crews use heavy tools and equipment that can cause minor dents, dings, and bruises. Check for this kind of unavoidable damage. It will need to be patched and repainted. Once you have addressed these concerns, clean the walls completely and give the baseboards a cleaning with a dishwasher detergent and water mixture. Use a Magic Eraser pencil for wooden surface scars.

5) Windows and mirrors

Neither you or your customers want to look at dirty windows. Dingy windows and mirrors look awful and it’s terrible for business. To restore window glass and mirror shine, use a heavy-duty glass cleaning product. Begin at the top and work down, and then be ready to rinse. You will probably have to repeat this process several times. For a great finish, let your last step be with dry cloth and polish.

6) Lighting – getting the shine back

You will start to wonder how the powdery dust got on everything. The lights and bulbs will be filthy. The dust film will actually reduce efficiency and produce an unpleasant smell. Be sure to turn off the electricity before cleaning light bulbs with a dry, soft cloth.

7) Cabinets, drawers, and closets

It’s so easy to overlook closets and drawers because they are closed most of the time. But you better believe the construction mess is in there too. And whatever you have stored is going to be dirty now, as well. Inspect all of your closets, cabinets, and drawers – and use a flashlight. Be prepared to clean the floors, walls and synthetic materials.

8) HVAC and interior systems

The HVAC system in your home is designed to pick up dust and dirt that is airborne. Construction activity certainly has caused a lot of that, and your HVAC is working overtime to keep up. Change the filters now. If your ductwork needs cleaned, hire it done professionally, as it is a big job. By hiring it done, you will get the entire HVAC tuned up and all registers and vents will be free of any impediments.

9) Sidewalks and driveways

What’s the old saying about “first impressions?” Your driveway, sidewalks, and entries are your guest’s first impression – whether it be your friends and family or customers and business associates. Make certain that your sidewalks are swept and you have gotten rid of any leftover building materials. Power wash the driveway and all exterior walkways. Dirt, sand, and gravel have accumulated throughout the project, and removing it will make a big difference.

10) Details and the final post construction cleaning touches

You’re getting close now. It’s finally time to put the final touches on this cleanup project. Polish the doorknobs, dust the window frames, outlets and switches, and vacuum all debris from sliding door tracks. Have a variety of sponges handy for this final stage. Let the fine tuning begin.

Why Your Should Hire Post Construction Cleaning After Your Home Project

Whether you have been remodeling a series of rooms, or have been building a brand new house, you should feel very happy and relieved that the herculean task is almost over. But, just as you think you are finished with this project, you also have to clean your home of any debris, which is another task that is much harder than it sounds. If your construction or renovation services did not include post construction clean up in their estimate, you are left to clean all the debris up by yourself, when you just want to finally conclude the project and start to live in peace.

But do not panic, as this can be a job for the best construction cleaner. Yes, you can leave the final job to a team of specialists that can clean your house or yard of excess dirt, rubble, garbage, disposables, or other irregularities. Here are some good reasons to consider hiring a specialty construction cleaning crew to take care of your post construction cleaning.

They give your house or room a great first impression.

If you decide to clean all the rubble on your own, you might not have the will or the resources to do a thorough job. When you show family members to the house or room at first, it may look rough and gritty. The best construction cleaner could change that, leaving the new rooms of your home flawless and truly flattering the people that you show your new home to.

They make your home look clean.

Your need home or room may look nice, but it will still smell quite like dirt and cement. When your home is finished, your home is likely to be filled with particles of dust and dirt that are not only on the floor, but in the very air that you are breathing, and it is almost a guarantee that you do not have the resources to clean this air yourself. Not only can post construction cleaning services clean rooms throughout your home, but they can also disinfect your home from germs and pest infestations.

They make your home inviting.

Nobody wants to wake up in the morning to a pile of garbage lying around the floor or yard. Not only do you not want to handle it all, but also it just does not stimulate any positive feelings towards you and other family members. Wouldn’t you rather wake up to a clean, new home or remodeled room with no further actions to take? You can hire a post construction cleaning crew to handle this for you, and you will feel great that you have done so.

They give you a great piece of mind.

Not only is the room not capable of looking as beautiful as designed, but having to live in a new house or room full of dirt and debris can be stressful. A post construction cleaning crew can do the work while you are free to do other important tasks at home or work, saving you a lot of time.

They make your home convenient to live in.

When you live in a new home or room for the first time, it may be tough for you to find anything in its proper place. It may take a number of days for the thing that you are looking for to turn up, due to al of the work that has been done. Post construction cleaning crews can help you put things in their right place, so you do not have to end up searching for it when you need it the most.

The Best Tips To Make A Good Care Of Possums

EXPERT TIPS FOR TRAPPING AN OPOSSUM

GET RID OF POSSUMS: HOW TO TRAP AN OPOSSUM

Opossum traps come in a variety of sizes and styles. Possum trapping tips include placing traps wherever you’ve seen signs of their activity, such as burrowing. Before setting a trap, always check with your local game commission to ensure you’re allowed to trap in your area. Also, avoid trapping during early spring and summer to prevent separating babies and mamas.

BAITING POSSUM TRAPS WITH THE BEST BAIT FOR POSSUMS AND OTHER OPOSSUM BAITING TIPS

Although they aren’t particularly finicky eaters, the best possum bait is fish or apples. Baiting opossum traps with canned pet food also works well. While there are differences of opinion as to the best bait for opossums, all professional trappers agree, the smellier the better. (No, your old sneakers won’t do the trick!) One of the most important opossum baiting tips is to smear the bait in, on and around the trap.

HOW TO DETER POSSUMS

Chicken-wire fence is a good method to ensure you won’t find a possum in your yard. Construct a fence that is four feet high with the top 12 to 18 inches bent outward away from the garden. You can “possum-proof” standard fencing by attaching an electrically charged wire along the top. However, if you’re like most, you’d rather not detract from your landscaping. If you really want to say goodbye to a possum in your garden and in your yard, apply a liquid or granular repellent that targets their sense of smell and taste.

POSSUM TRAPPING TIPS

POSSUM TRAPPING WITH LIVE CAPTURE TRAPS:

These come in two forms, either live capture cage traps or possum leg hold traps. Live capture cage traps are ideal for use near your home or dwelling. These are safe to use in areas where pets or other animals are nearby, as any non-target animals can be released. Cage traps are easy for you to use, simply lift the door and set the trip hook and place bait or possum lure at the far end of the trap. Pestgard large possum cage trap or pro version cage trap are larger than most cage traps available. These are suitable for catching all sizes of possums along with other animal pests.

POSSUM TRAPPING WITH KILL TRAPS:

Possum kill traps have the advantage of killing possums humanely in the trap, this also means they do not have to be checked as regularly as live capture traps. It is not recommended to use kill traps in areas where pets or non target animals may be able to access the trap. Like leg hold traps, possum kill traps are set on or near trees where there is regular possum activity.

possum

How to Trap a Possum: Picking a Possum Trap

What Should be Done to Avoid Catching Opossums Later?

Opossums are small animals, their maximum length is 40 inches and they weigh up to 14 pounds. Possums’ natural habitat is wet and dry forests and fields. They prefer to settle near swamps and rivers in abandoned burrows or hollows. They can also settle among piles or in the attics of abandoned houses, in the basements or under houses.

What Do Entomologists Recommend? 7 Rules of Successful Possum Catching

What should you do if possums actually love your place and irritate you? To rid yourself of unwanted neighborhood you can use: Live Animal Trap, other traps, repellents, guns and simple sticks. Here are some pieces of advice from the scientists to help you to properly trap a possum.

The Best Live Animal Trap to Catch a Possum

Acquiring a high-quality Live Animal Trap, which will allow catching a possum without harming it is the simplest and most humane way of possum trapping. We’ve picked two best traps of all the plenty available.

How to Get Rid Of a Possum: A Detailed Guide about the Methods and Possum Repellents

Know Your Enemy: Possum Facts to Help You Get Rid of Them Effectively

These tiny animals of a size of an adult cat don’t attack people unless they have rabies. Opossums are nocturnal animals, and they feel most comfortable in the dark. Many homeowners have never seen them move around the yard and its surroundings, but they often find evidence of the animals’ presence in the morning. Litter, broken things, gardens, empty feeder for pets, compost heaps or scattered garbage cans can all signal the opossums’ presence.

How do they work?

Repellents affect one of the animal’s senses: scent, taste or hearing. Some repellents have a smell that causes fear, as they smell of natural enemy predator urine. The composition of granular and liquid repellents include predators urine, egg powder, castor oil, garlic and soap, as well as products containing capsaicin (hot pepper extract). The electronic repellers on the other hand repel animals with flashing light, sound or water. In our review, we have selected the best possum repellents of all three types.

What to do if there’s a possum in your roof

Do you have a furry housemate you’d like to evict? Here are four simple and gentle ways to move them along.

Possums are regular visitors to South Australian gardens, especially common brushtail and common ringtail possums. Both are nocturnal, but brushtail possums are about the size of a cat, with bushy black tails, thick grey fur and large ears, while ringtails are also grey, but are smaller, with small ears, and skinny, white-tipped tails.

Possum boxes

Buy or build a possum box or two, and put it in a sheltered spot in your garden at least 4 metres off the ground. Check the boxes regularly to make sure that bees, wasps or pest birds such as starlings have not taken up residence.

Secure the roof

Look carefully for any gaps or holes around the eaves, then wait until dark. When you see the possum leaving the roof, block the gap with wood or chicken mesh.

Install a one-way door

If you’re struggling to see when your possums are leaving the roof or concerned that one will be left behind and become trapped, a pest controller will be able to advise on how to install a one-way door that will let the possums out but not back in.

Possum traps

The first thing to note here is that trapping possums requires a permit. Most councils have wire mesh possum traps you can rent. Put the trap in the roof near the possum’s access point and check it every morning.

Use Wedding Videographer To Make Wedding Memorial

What Should You Look for in a Wedding Videographer?

You may have already decided you’d like to hire a wedding videographer, but there’s still a lot to think about. First, do you want to have your entire day captured on video, or just the ceremony? Are you hoping for a chronological look at your nuptials, or do you prefer a more cinematic film with different parts of the day all mixed together? With varying video styles, personality types, and working styles, you’ll want to be sure you’ve found a videographer who checks all of your boxes. But what exactly should you look for in the pro you choose?

Hire friendly photographers and videographers. 

There is a lot to capture on your wedding day in a short amount of time. Both your photographer and videographer will film the same key scenes: getting ready, first look, ceremony, speeches, reception, etc. Coordination is important, so try to hire a photographer and videographer who have worked together before. This way, they will likely have systems in place to make sure each captures those special moments. Ask your wedding planner for recommendations or have your photographer to suggest a videographer (or the other way around) for a seamless day-of experience.

Find a filmmaker who is comfortable with your venue type.  

Found a filmmaker you love but notice that all of their films take place outdoors and you’re getting married in a ballroom? Raise the question to the filmmaker before you hire them and make sure they’re comfortable shooting in your wedding setting. Request sample films to watch and show them an example of a film you like from your venue (or a similar) and confirm they’re comfortable shooting in similar circumstances.

Understand what’s included in your package.  

As wedding films have increased in popularity, so have the package options and the terminology. Understanding everything that comes in your package will help ensure you aren’t disappointed later. When your filmmaker sends you examples of what comes in your package (Instagram teaser, trailer, full edit, etc.) make sure to really watch each example and be sure it’s the type and amount of coverage you want!

Raw Footage: What is it?

Generally Raw Footage means “unedited footage”.  This can be quite useless to a couple because it will include all the camera movements and sounds that are native to making a film.  When a documentary videographer edits the full ceremony, for example, he takes all these unwanted aspects out and “edits” it in a more appealing way.

For example, the videographer will probably have at least two cameras. One may be “locked off” on a tripod facing the crowd or the altar etc and it will not move for the entire ceremony which could be an hour long. However, this camera may not have any sound because the videographer is using separate sound recorders which have to be synced in editing.  The second camera, the one in the videographers hands will have lots of undesirable footage as he moves from one shot to another whether by re-framing (zooming) or by physically moving.

What Is Their Final Product?

And the last but perhaps most important thing to know is what you should expect for a final product. Of course, you should always make sure to read every contract from your vendors extremely carefully, but that is especially true for something as important as wedding documentation. You need to know what type of video your videographer specializes in. Are they creating more of a feature film of your day with full edits, background music, voice overs, etc.? Are they doing a less-edited, more natural view of your event? Are they only providing you with one full-length film or are they also including a highlight reel for social media sharing? Most of these questions will be apparent in a sampling of their work that you should take time to watch before making your decision, but you can also ask them to describe their work themselves during a consultation.

PACKAGES

From Teasers to Full-Length Documentaries

Here are some of the most popular package options you’re likely to see when hiring a videographer

  • Highlight Film (3-10 min) – With many videographers, the highlight film is the final product you will receive. More commonly, this film is non-linear and takes a more modern approach, where the videographer has truly created a piece of cinematic art out of the events and moments throughout your day.
  • Short Film (10-20 min) – If you decide on a package with a short film, you will receive an edited version of your wedding footage that takes a more linear form, often including a portion of your vows, reception toasts, etc. Depending on how long you book your videographer, the film may also include getting ready footage, first look footage, and grand exit.
  • Same day edit (4-10 min) – Some videographers offer an option to have footage from your wedding edited on the spot and shown during your reception. This can be a fun surprise for guests on the day-of!
  • Full-length documentary (30-90 min) – If you are interested in reliving the majority of your day, this option is for you! Your videographer can create a longer film that includes entire sections of your wedding, like your ceremony. Due to the length, this option is the most like a true movie of your wedding.

Most videographers offer additional options to receive additional footage from your day. A few popular add-ons include: dancing, full edit of ceremony/reception, father/daughter dance etc.